

|
How to Setup FeedBurner on Blogger
Blogger is a great blogging platform which almost anybody can use. If you already have a Google account, it’s easy to setup (if not you just need one) and start blogging within minutes. The downside of using Blogger is the lack of built in features that are in my opinion essential to have. I’m going to share with you some of my favorite free Blogger add-ons that I highly recommend using. The first of the bunch being FeedBurner
Step #1 - Setup a FeedBurner Account
FeedBurner’s free rss service (now owned by Google) is very powerful. It allows you to place an rss image like the ones you see below on your blog so your readers can easily subscribe to your blog content. FeedBurner also offers a way for your readers to subscribe by email so everytime you post, an email will automatically get sent to them. Other features include seeing how many blog subscribers you have , which posts are most popular, as well as many other rss feed statistics. You’ve probably seen images like these on websites and especially blogs. This is what they are using. ![]()
![]() Create your free account now.
Create your free account now.
Step #2 - Create Your Feed
The main piece of information you’ll need when setting up your FeedBurner account is your original blog feed url. All blogs automatically come installed with a feed but nothing is really done with it. That’s where the magic of FeedBurner comes in. Your feed url will look something like this:
http://yourblognamehere.blogspot.com/feeds/posts/defaulthttp://yourblognamehere.blogger.com/feeds/posts/default
Feedburner offers auto discover so you don’t even need to figure out your feed url. Just enter your Blogger url right on their home page and it will automatically discover your feed. If you have more than one blog, it will list them all so select the blog you’d like to setup.

For bonus points and just for fun, paste the url into your internet explorer browser and watch what comes up. It’s basically the raw text and images from your blog posts. Pretty neat huh?
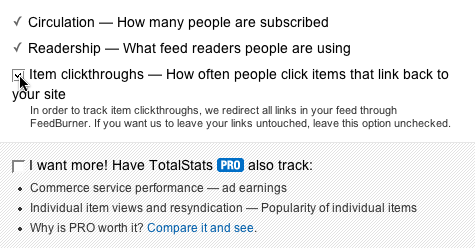
Follow the rest of the setup wizard and you’ll eventually come to the configuration page. Here’s where you want to select the extra features like “track item clickthroughs” and also check the “FeedBurner Pro” box. They used to charge $4.95 a month extra for this service but ever since Google acquired them, they offer these extra features for free. Why not take advantage of it?
Click the Next » button to finish the setup process and enter the feed management interface. Now you’re now ready to make your FeedBurner feed available on your Blogger site!
Step #3 - Point Your Blogger Feed to FeedBurner
Once you setup an account on FeedBurner, you’ll need to make sure all feed traffic for your blog content goes to your FeedBurner feed. This helps make sure your FeedBurner stats are more accurate and even any existing subscribers to your ‘Original Feed’ are routed through FeedBurner.
-The first step is to get the url of the new feed you just created. When you setup your Feedburner account, it asked you for a name of your first feed. For example, our feed on eBlog Templates looks like this:
http://feeds.feedburner.com/templatestreasure
Here’s the screen where you’ll find your new feed: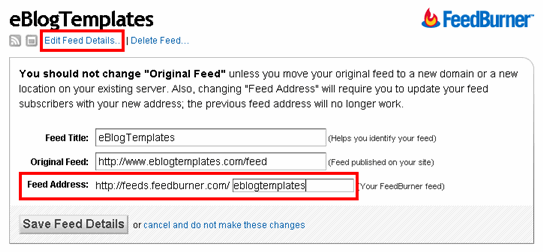
Once you click on the “edit feed details”, you’ll see this screen. Notice what I highlighted in red? That’s the feed url you need to copy and save.
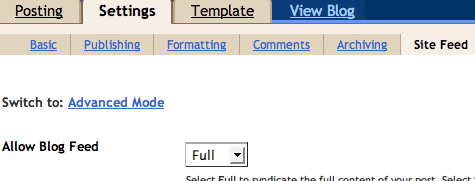
-Now you’re going to log into your Blogger account and head on over to the “Settings” => “Site Feed” tab.
Scroll down until you find the “Post Feed Redirect URL” text box and enter the FeedBurner feed url you wrote down earlier. It will look something like this:
http://feeds.feedburner.com/templatestreasure
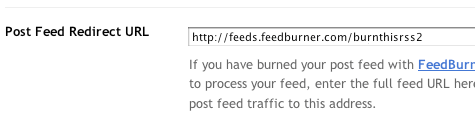
Make sure you type in your entire feed address including the “http://” portion otherwise you’ll have problems later. Click the “Save Settings” button and you should see the message “Settings were Saved Successfully”. Now Blogger will redirect all feed traffic for your blog to your FeedBurner feed which is exactly what we want!
Step #4 - Promote Your FeedBurner Feed on Your Blog
So now that everything is wired up properly we just need to promote it using one of those cool rss buttons on our blog. FeedBurner calls these icons chicklets (cute huh) so that’s what we’ll call it. Switch back over to your FeedBurner account and click on the “Publicize” tab.

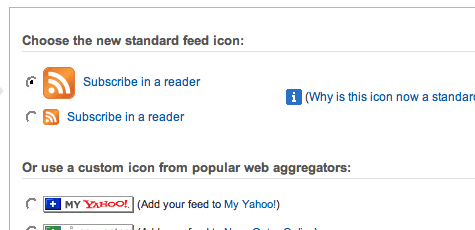
Then on the left side find and click on “chicklet chooser” and select one of the icons which will end up on your blog.
Then scroll down to the bottom of the page and click on the drop-down. You’ll want to select “Blogger” to add the chicklet as a widget to your blog.

After you click the “Go!” button, Blogger will open in a new window and you’ll need to follow the prompts to continue to add the new widget.

Once you click on “Add Widget”, it will take you to your Blogger page elements layout where you can arrange the new FeedBurner widget. Save your layout and you’re done! You should now have a cool-looking rss feed icon on your blog where anyone can easily subscribe to your blog. Remember to login to FeedBurner often to check out your stats. You can accurately see the number of subscribers and also get a good idea of what people are reading. It helps you decide the types of things to write about in the future!
For extra credit, see if you can add the Email Subscription widget to your blog. It’s a great option for people to use who don’t understand quite what rss feeds are. I’d also recommend spending some additional time browsing around FeedBurner’s interface because there’s lots of other cool options for you to configure. The best things in life are always free.
Blogging Tips
|
|
What’s Next? : Don't Just Move Away... Wait! Say something by using the Comment Form below.My Blog is a Do-Follow so enjoy giving your comments and get backlinks from my PR3 blog.
 |
|  Add your Comment |
 Share and Enjoy!


Keywords : Cheap Domains, Make Money Online, Blogging Tips, Web Hosting, Blogger Templates

 Older Post


0 comments
Post a Comment
Hello and welcome to Smart Bloggerz. I appreciate your comments and if you like what you just read you can subscribe here to get quick updates.
Also, My Blog is a Do-Follow so enjoy giving your comments and get backlinks from my PR3 blog.